Its summer time and my "to-do" list is a mile long, update the school's website, inventory and clean up the computers, switch some computers around, set up new computers, plan for next year, and so on. However, I gave myself something extra to work on this summer - revamping my old desktop computer and making it useful (to me) once again. It was getting time to clean it all out and do a fresh install of Windows on a wiped hard drive. This is something I try to do every year, but sadly the neglected computer was long over due for a good cleaning. The poor thing had become sluggish and cumbersome, so much so that most of the time, it was easier to pull out the Macbook Pro and sit at the dining room table whenever a computer was needed.
Something had to be done about this sad computer that sat quietly day after day unused in the corner of my desk. I could go through the trouble of backing everything up, cleaning the main drive off, and reinstalling Windows XP and ALL of my programs on it, once again, like I've been doing for years, follow the kids' route and go Linux (both of my two older kids have recently switched over to Ubuntu on their laptops, and love it!), or I could go the Mac way since I'm so used to working on Macs at school. My Geek Man talked me into rebuilding my computer with some of his old (but still new to me, and better than what I had been using) parts and a few new parts, and installing Snow Leopard, Mac OS 10.6 on it. (He just recently upgraded and rebuilt his computer, and thus had extra parts.) Essentially, I turned my desktop into a Hackintosh machine.
I would not recommend to everyone to go through this process - its not for the timid or weak! It took me about a good solid week to get it up and running (stable) with Snow Leopard on it, and another few more days to have Mac running on my SATA drive. I discovered I was not able to install Mac on my new terabyte SATA drive, but had to use an older IDE drive to set up Mac OS on. Once I had it running stable on the IDE drive, I was able to hook up the SATA drive, use Disk Utility to format the drive for Mac and partition it, then use Carbon Copy Cloner to clone my IDE drive with all my Mac applications loaded on it onto the SATA drive.
Along the way we ended up buying another mother board as the other one did not support AHCI. As it turns out, the new one, which was on the recommended list of mother boards, does not support AHCI. (Many of you are thinking, AHC-what?! I'm not sure I fully understand it either, but I know its a setting in BIOS that is essential for allowing Mac OS X to run smoothly on non-Apple parts.) We also bought a new video card for the computer, one that was also on a recommended list, but ended up going back to the original one I started with. And, with the new mother board, came new RAM (memory).
I also have been able to set up Windows XP 64-bit as a virtual machine (using Virtual Box). Although, I think I'm going to be getting Windows 7 64-bit and installing that on Virtual Box instead so that I can run Office 2010 on the Windows side.
It's still not 100% on par, yet, but its getting there. There are still a few kinks that I am currently working on, such as being able to boot directly into Mac with a bootloader disc (iBoot), running at 64-bit rather than 32-bit on the Mac side, and making use of all 8 GB of my RAM rather than half. Today I set up the speakers on the computer, something I haven't had on the desktop in years, and am happy to report that they do indeed work on this set up.
So, here's the specs for the new rig:
2.4 GHz Quad Core Intel Xeon processor
Asus P5G41T-M LX plus mother board
nVidia GeForce 8800 GT graphics card
8 GB 1066MHz DDR3 RAM (can only get it to use 1 of the 2 sticks, so operating at 4 GB)
Logitech Z5500 THX 5.1 Speakers
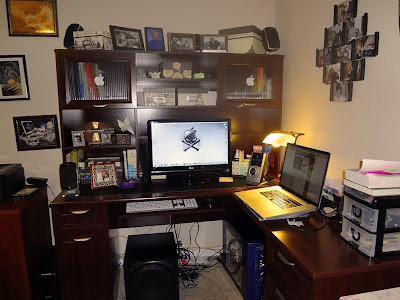
And, with a new computer system, came a new desk and workspace! Haven't totally put the new system to the test yet, or even given it a good work out. But, I have been using Photoshop CS 5 on it the last couple of days, and I have to say, Photoshop has never loaded quite as fast as it does on here now.
One thing I would strongly advise for any rebuild, or reinstall of any operating system - back up EVERYTHING before you begin. I made the mistake of not backing up my main hard drive that had my working desktop and all of my programs
on it, and discovered afterwards the drive had gotten damaged in the process of switching drives. Minor set back - just had to redo a few graphic files I was working on that I had saved on the desktop on that drive. Fortunately, I always keep my data on other drives separate from my operating system and programs/applications drive, so was able to back up the majority of my data.
Some sites I highly recommend you read up on, if you are thinking of trying something like converting your old Windows machine to Mac:
Now that the rebuild and revamp is mostly done, and the new desk is put together, maybe I can work on some of that summer "to-do" list!