I've used Photoshop for the better part of 15 years, but have never played much with the pen tool or paths. I've mostly used it as a graphic and photo editor rather than a drawing tool. (I know, some will tell me I should have used Illustrator or Corel Draw, but old habits die hard - I'm quite comfortable designing in Photoshop.) If you are like me and fairly inexperienced with using paths in Photoshop, this is for you:
Open a new document in Photoshop and add a new layer. (Or just add a new layer to what you are working on where you need the shape outline.) Select the Brush tool, making sure it is on the Hard Round setting rather than the Soft Round setting (otherwise you end up with blurred outlines), and set the Size to the size of thickness you want your outline to be. I set mine to 10 pixels.
Go to your color selector and select the desired color for the outline. (I chose red.)


Make sure your Shape Tool is set to "Paths" rather than "Fill pixels", other wise you will end up with a solid shape.
And draw your shape:

Next, go to your Path palette and select your work path.

Right click (or control + click, on a Mac) so you have your Work Path edit menu, and select "Stroke Path"

You should have a color outline of your shape with a path sitting on top. It looks like a thin gray line.

You can get rid of your path now and style the outline as you like, by clicking back on the Path Palette, right clicking on the Work Path, and selecting "Delete Path":

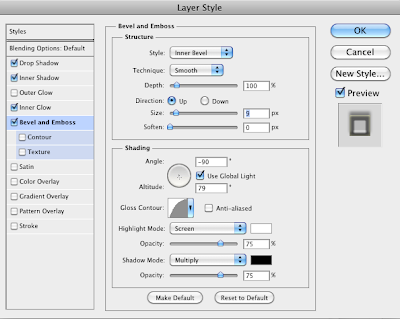
Apply your desired Style from the Style Palette and create your own using the Blending Options in the Layer Palette. I made mine glassy looking with a rounded Bevel. This is the setting I used:

And ended up with a heart frame that looks like this:

Now you have an outline you can use to frame what ever you want inside. Its great for outlining headers, framing menu boxes, or adding an little extra to your photos. Whatever you do, just have fun with it!


0 comments:
Post a Comment