Wednesday, December 28, 2011

Twitter - The New Web 2.0 Chatroom

As I was sitting here hanging out in Twitter, one of my favorite spots on the web, it occurred to me that Twitter has become the new chatroom. But, what I also realized was how much better than a chatroom Twitter has become. In the old days of chat (5-10 years ago, after the realization that AOL members rooms and AOL was not for me) I used to frequent a Yahoo chatroom about and for web designers and offer help and advice to those that wandered in. There were other regulars (regs) that would hang out there that we would chat with and get to know, some on a more personal level than others. For me, it was a chance to develop my personal learning network (pln), learn more about web design and graphic design, show off some of my skills, teach others what I know, and to relax and unwind while still maintaining some intellect. For others, it was a place to spam their wares or business, have things done for them, or to look for companionship. We would have the spammers and the porn bots that would come in and invade our chats, but there were ways of dealing with them - usually either through our chat client or by placing them on ignore (into the iggybin).

I liked the fact that it was topic based and that unless you were into web design or graphic design, unless you were a bot or a spammer, the topic stayed around the interest of web design. Occasionally, when I had questions I could not answer about my Macs, I would venture into the MacIntosh room, and always found the regs in the room very helpful. But looking back, it was room hopping and just didn't feel very much like "home".

With Twitter, I can choose who to follow under a multitude of interests and topics, I can follow different (hashtag) conversations, share tweets I find of interest with others that follow my feeds (through retweets), join regularly scheduled weekly chats of my interests, and have the luxury of not having spammers or bot posts show up in my time line feeds. Instead, the spam feeds are kept private to mentions and I can click a button to delete their post, block the sender, and report them as a spammer all in one click of the mouse. My followers never need know of their post unless I choose to share it with them. And with 140 characters to a post, it forces people to think more intelligibly before they post, and we don't end up with those just wandering in saying, "Hai frnd". I really like how I am not limited to a single topic in Twitter, and do not feel like I am wandering from room to room if I want to follow another topic of interest other than web design or STEM teachers. I also don't have to worry about others coming into the chatroom with the obnoxiously large red font crying for help or the "perdy" rainbow font wanting to be your "frnd" as they used to in the old days of Yahoo chatrooms.

I am still able to learn from others, and share my knowledge with others, as I was able to in a regular chatroom, still able to offer help and advice, and able to do all the things I loved about being a reg in a chatroom, only now I can follow the feeds long after I have gone to bed or while I'm busy in school during the day. If anything, I've found that I have learned more in the short time that I have been active on Twitter than the years I have spent hanging out in chatrooms. My PLN has grown by leaps and bounds ever so much more than it has in the chatrooms, and I am finally accepted as an intelligent, funny, interesting, talented woman rather than some geeky chic, Kinetic's girlfriend, or the room's FM (freak magnet).

Tuesday, November 22, 2011

Be courteous, save as legacy

In a recent email to my staff, answering several complaints about different versions of documents, I recommended that they get in the habit of saving their documents in the legacy format, that is the older versions. This way, no matter what computer they tried to access that file on, they would be sure to have a version that would open their files, such as being able to open MS Word docs versus .docx with the extra .xml additions on the file.

How many of us go out and get the latest versions of a program, get all excited about using it and trying it out, only to create something that someone else cannot view because they do not have the current version of that program? I know I have been guilty of this in the past with various versions of Adobe Photoshop and Illustrator. But, what good does it do us to have the latest (and greatest) versions, if we cannot share the files we created in them with anyone?

Thankfully, Microsoft has supplied us with the XML file format converter so that we are able to open .docx, .pptx and .xlsx file formats of Word, PowerPoint, and Excel. But what about some of the other programs that we have gotten used to using, such as iWork Pages and Keynote? How can I change the file format version that is saved on there? If you are fortunate enough to have a copy of iWork '09 on your Mac, you can save copies of what you created as '08 versions, but not '06 or '04. You could also save it as a .pdf if you only want a readable copy to share with others. But, if you want them to be able to edit their copy that you sent them, it looks like you can only go one version back.
From the Save As menu, go down to the bottom of the window, and check the box that says to "Save Copy as:", from here you can save a copy as a MS Word .doc or as one version earlier, as in the example:


In Adobe design programs, such as InDesign, and Illustrator, it gets a bit trickier to find as you have to do a "Save as" first, name the file, and then when the next window pops up (Options window), you can select your version choice from the legacy format options. I've actually had to do this for a few print shops, as I was excited about having the latest version of Illustrator, designed a logo for school I wanted, and discovered the hard way that not everyone has the latest version. At which point, I felt, like Ooops, sorry!

I have often seen in a network situation like school where computers bought at different times will have different versions of programs or applications installed on them, or will be licensed for different versions of the programs. Then it becomes rather harried when a student starts a project on one computer, and goes to finish it on another computer, only to discover he or she cannot open that file on that computer. Or while working as a member of a team, goes to pass off the file to another team member, who cannot open the file on their computer. However, if we get in the habit of saving files as older versions so that we can pass those on to others, then we can avoid awkward moments, and time spent having to go back and resave and resend those files. This also comes in very handy in a school network situation where you are sharing the files with many people or many computers.


Sunday, November 13, 2011

Twitter for Teachers

My resident tech/web guru suggested Twitter to me as a way of boosting and advertising my website. So, I signed up for an account and thought I would check it out and see what it could do for me. I've had a Twitter account for a little over 2 years and it wasn't until this summer that I have really started using Twitter and making it work for me. Now, I'm not at all sure what its done to drive traffic to my website. And frankly, the site itself is in such a desperate need for a make over and update that I would be embarrassed by the shear numbers that were to visit my site from Twitter. But, what Twitter has done for me is something I never considered at the time I signed up for it - Professional Development!

For those new to Twitter, Twitter is more than checking in when you visit your favorite taco stand. Some of the brightest, funniest, most intelligent and most interesting people I know use Twitter to connect, network, collaborate, and as a means of professional development. Twitter is microblogging, that is, sending out "tweets" in 140 characters at a time. Now, some of you may think this isn't a lot to say what you need to say; but, if you think about it, 140 characters is enough to say what you need to say, and cut out all the extra BS. (I know, I'm in trouble, right?!) Most people have to keep their posted thoughts in under 160 characters anyway for text messages, Twitter is just a way of making sure you get to the point, and quickly.

Since I began regularly using Twitter this past summer, I have been able to network with other teachers from around the world, learn about webinars that were available to me (for free!), join learning networks, and learn from other teacher's blogs without having to Google for the information that I was looking for. I've learned about free tech conferences that were available in my area that I would not have otherwise heard about, and have been able to help colleagues with information I have found in my feed. With Twitter, I feel like I am always in school learning, but I get to control when and where I go to class. There are hashtags that allow you to follow search for and follow particular trends (like #STEMed that allows me to read up on posted tweets about STEM education without having to follow most of the users) or chats. And at 140 characters, its so much easier than doing a book study!

Have an extra few minutes while you are standing in line at Walmart? Take Twitter with you. I guarantee you will get more out of it than reading the headlines on the tabloids. Most of the handheld electronic devices, and smart phones have Twitter apps, such as Twitbird, Tweet Deck, and Peep, to name a few. Most of them are free downloads. And, if you follow a celeb or two, you may even learn some things that they don't post in the tabloids.

Give Twitter a try, but don't be a lurker hiding in the background. Its more fun when you participate in the conversations and feeds. Its easy to get started, just type in a keyword of something you would like to read about, and see some of the posts. If you find a post you like, you can read more about the person in their profile and blog. Use the "Follow" button to follow them. Twitter will suggest other people with similar profiles you may want to follow. But, you can check them out by looking at the tweets (posts) before following them. If nothing else, your students will think you are cool for being on Twitter, and may pay more attention to you.

Tuesday, October 25, 2011

Converting AppleWork files to iWork Pages

So, you have a whole unit worth of lesson plans done in AppleWorks, but Apple has dropped its support of AppleWorks. And even more important, so has your school district! Now what?! Don't fret, and no need to spend your precious spare time (what's that?!) rewriting them; convert them easily into iWork Pages.

Good news! Apple iWork software can be used to convert your AppleWorks wordprocessing and/or spreadsheet files. You can covert AppleWorks wordprocessing files into Pages, and spreadsheet files into Numbers.

Convert AppleWorks files using iWork Pages or Numbers

1. If the file you wish to convert is a ‘wordprocessing’ file, open the application Pages. If the file is a ‘spreadsheet’ file, open the application Numbers.
2. Next access the menu option File-->Open and navigate to the file you wish to convert.
3. Select the file, and click Open.
4. Next access the menu option File-->Save As.
a. Rename the file (i.e., filenameNEW or any tag you wish to identify converted files.
b. Remove any special characters (i.e., quotes, brackets, parenthesis, etc.) and all punctuation except for the suffix ending (i.e., Pages = filename.pages, Numbers = filename.numbers; or in the case of a MS Office file: Word = filename.doc, Excel = filename.xls).
c. Choose a location for saving the file.
d. Click the Save button.
5. Close the file, select the next file to be converted if any, and proceed.
6. When conversion is complete, it is recommended to delete the old AppleWorks file (these files display without the ʻNEWʼ appendage, and may show the suffix ending .cwk) to avoid confusion, and saving unnecessary copies that only take up space.
Please note that AppleWorks ‘drawing’and/or ‘database’files cannot be converted at all –sorry!

One Additonal Note about AppleWorks drawing, or painting files:
You can save and convert these files over the iWork Pages IF you follow these steps FIRST:
◆ Open the drawing or painting file you want to convert in AppleWorks
◆ Edit>Select ALL
◆ Edit>Copy
◆ File>New (Word Processing)
◆ Edit>Paste
◆ You may have to go up to Format>Document and adjust the borders/margins of the document for all of it to show up. Drawing files are by default set up with a narrower page border.
◆ File>Save (or Save As - this should pop up with this being a New file.)
◆ Name your document and click on the Save button
◆ Follow the steps above for opening and converting your AW file in iWork Pages.

Conversion Tip: Export into MS Office Word or Excel
If you would prefer, after converting AppleWorks files into Pages (.pages) and/or Numbers (.numbers), you can ‘export’the file into Word or Excel. Here’s how:

1. With the file open in Pages (or Numbers if you’e working with spreadsheets), access the menu option File --> Export
2. Select the Word (or Excel) icon and click Next
3. Save with a new filename, if desired.

Wednesday, August 3, 2011

Advertisers Beware!

While browsing through one of my favorite lesson plans exchange sites today, a quick tour of the recent additions page, I noticed over half of the posts were from a particular educational software site. I clicked on one of their lesson plans and quickly discovered the instructions consisted of two lines.
  1. 1. Subscribe to their site
  2. 2. Check out this great resource, with a link to that lesson on their site
But not much more to tell you anything about it or how to integrate it into the classroom.

Please excuse this rant, but, when I log into a teacher exchange website, I'm expecting to see posts from other teachers, as opposed to spam. If I wanted spam, I could log into Facebook more often, or revisit an old chatroom I used to hang out in.

If you are an advertiser/software vendor, please post only a few posts in teacher exchange sites telling us a little about your site and ways it may be helpful to us as an educator, rather than dominating the site with useless posts of links to your site. These are not helpful to us, and I find these to be quite a turn off! I've learned much more by a month of two in Twitter communicating with other educator and learning from them about sites that I can really use, and ways they are useful. These are the sites that I repost in emails to my staff, and write about in this blog. Rest assured, if you are an advertiser that posts nothing more than links to subscribe to your site and a resource page on your site, I will avoid your site. An advertisement is supposed to entice the viewer to your product, not turn them off from it. So spend a few extra minutes telling us about your site and what it can do for us rather than simply posting links to pages in your site.

Just my thoughts. Who am I? I am the consumer you are targeting, and I am the consumer that can make or break your business through all of my contacts, and their contacts.


Create page flipping books with FlipSnack

I really wished I would have known about this site two years ago, or wished this site had been around a couple of years ago. A quick look at their registry tells me it wasn't around... This site would have saved me so much time, and my family so much aggravation in watching me spend more than two hair pulling weeks trying to create what this site can create for you in minutes. I'm talking about FlipSnack, part of the SnackTools site free site tools line, that takes your .pdf files and turns them into beautiful page turning digital books that you can share.

Creating an interactive page turning digital book with FlipSnack takes only a few minutes, and is pretty simple to do. When you log into the site (free registration), click the big yellow "Make a flipping book" button, or the Create a book link at the top to start creating your page flipping book. You are given options to either browse your computer for a .pdf file, or enter the URL to a .pdf file that you would like to turn into a book. Then allow it a minute or two to upload your .pdf file. From there it will take another few moments for it to compile your book. (Go check your email or Twitter feed for a minute or two while this is going on.) When its done, the fun begins. Click the Next button and you can easily customize your book. The interface gives you choices to customize the background color or texture behind your book, template styles, and size options for your book. You can view it in widget mode or full-screen view. There are also options for including sharing options for you book, so the viewer can share it in a number of social networking sites such as Twitter, Facebook, and Blogger. When you've achieved the look you like, click the Finished button and its done. You are given a link to your book, with other options for sharing, such as embedding.

There is a premium (VIP) version of the site for $24 a month that gives you access to all of the Snack Tools sites with premium embedding (no watermark), and downloading options, but for most uses, the free version will suite you just fine.

I created this page flipping book in about five minutes from a file I already had uploaded on my site of a photography weekend trip I took last summer.


However, my Creativity Portfolio book I created for my Creativity in the Classroom class I took a couple of years ago took me several weeks of searching through free and relatively inexpensive flash and javascript catalog and photo album page turning book scripts, and trying to figure out the code and integration myself. It was a maddening two weeks + around my house during that time. Yes, I learned a lot from that experience, and can say I know the technology behind this, but its not something I do everyday, nor have I repeated the experience since then. FlipSnack makes this process a whole lot simpler and quieter! I don't think any one else in the house knew I was creating the book this time around, at least not until they read this!

Imagine adding an extra dimension to those teaching portfolios with an interactive digital page flipping book, create exciting interactive story books for your students, or have your students work a math story then turn it into a beautiful book they can share.

Tuesday, July 19, 2011

Child-like Discoveries

"Childhood is measured out by sounds and smells and sights, before the dark hour of reason grows." ~John Betjeman, Summoned by Bells
Children are a wonder. They have this natural curiosity about all things that allows them to explore and discover their surroundings. They lack the sense of danger that comes with age and experience that allows them to learn without hesitation through their explorations.

All too often as adult we are afraid to try new things for fear of failure or fear of breaking something (like ourselves - our bones, or the machines we are on). But what could we accomplish if we approach these opportunities with child-like optimism?

Many times I'm asked, "How did you learn how to do everything on the computer? Did you take classes?" Sometimes I do tell them of classes and training sessions I've had, but most of the time my response is simply, "I've learned from trying and not being afraid to push buttons." And then I see the look, that puzzling, timid, shocked, scared, well - what if I break something look. And here's the beauty of it all, and my reply, its only a machine and can be fixed or rebuilt.

Last week I got a new Android phone and have been trying to learn a new user-interface because I'm not familiar with Android OS. I think I gave the battery a pretty good workout this weekend on an photographic excursion to Naples (Florida). Although I brought my dslr and all its bulky lenses and equipment with me, sometimes it was just easier and more practical to slide out my handy cell phone and snap a picture or two. While I've been taking pictures and uploading them to Facebook and Google Plus, I've also been playing with the settings and seeing what each setting was capable of. Sure, I could have read manuals, blogs, and other articles about my phone; they all would have helped me learn about its capabilities. But I find the best way to learn something is to just play with it and see what it can do. Some may be saying, what if I broke my new phone? Well, my thinking to that is that I have all of my Contacts backed up elsewhere, and my pictures are all saved onto a memory card (and most have been uploaded to my computer), so if I really messed my phone up badly, I could always reset it as a LAST resort, so no harm in pushing buttons!

My mom has a smart phone and hates it. She says she doesn't understand it and doesn't know how to work it. On a recent visit, my children and I played with her phone for about five minutes. The interface was different than what I was used to, but I was still able to figure out a few things on her phone. We made her a video and showed her some things on her phone she never knew existed. She wanted to know how we knew how to do those things on there so quickly. My question to her was, well, have you played with it? She didn't understand the question.

When many adults think of the word "play" the word is interpreted as something children do. Yes, children do play - it's how they learn. When children play house, they are learning how to communicate with one another, and they are learning how adults do things in the real word. When children play games, they are learning about sportsmanship and strategies. Younger children love to learn, because to them, learning is fun. They have not, yet, equated learning to work. I think we as adults need to spend less time working at work, and more time playing at work. If nothing else, it would make work a more fun place to be. Have you played today? :)

Tuesday, July 12, 2011

Turning words into art with word clouds

I know I've blogged about using word clouds to create works of art earlier this year, but after participating in yesterday's webinar on word clouds, I decided to try out each of the reviewed sites and see what they could do. I think I also mentioned in my blog, yesterday, about the webinar that this post on word clouds was coming next.

I've also been told by some that my posts are WAY too long and I need to keep them shorter if anyone is ever going to read them. So here goes, 4 word cloud sites, the ins, outs, good, bad, and ugly, as short and sweet as I can get it.

I decided to use the same list of words for each of the 4 sites so I could get a better comparison of what each is capable of. I kept the list in a TextEdit page, copying and pasting the list each time into the 4 sites.

Since I've already written about Wordle before, let me share some things I've since learned about this site. You can increase the size of a particular word in your cloud by repeating the same word a time or two in your initial word list. You can also use sentences, phrases and word strings (or compound words) if you use a tilde (~) in between the words taking the place of a space. For example, "nuts and bolts" would be written out "nuts~and~bolts". (Only, no quotation marks.) I've discovered a good way to save your image, other than taking a screen shot, is to save it as a .pdf. Otherwise, Wordle does not provide a way of saving your images, other than posting them in their gallery and showing you a link to your word cloud.

Here's an example of my elementary engineering terminology - click on the image to see a larger image and close up of the words:

Wordle: Elementary Engineering


Word It Out is a new site to me. I had not heard about this site until the webinar. That being said, WordItOut is pretty simple to use, and very straight forward. You simply type in (or copy/paste) your word list, and click the "word it out" button. The generator does the rest for you. The things you have control over include the color scheme, fonts, and target. Target is where you want your word cloud centered. You could move the target so the words move stemming from one of the corners, in the center, or off to one side. When your are done, push the "save" button, and the site emails you a link to your word cloud.

Here are the same words used in WordItOut - click the thumbnail image to see a larger image:

I chose to keep this one rather than customizing it futher because the color scheme and the font style reminded me of a chalkboard.


WordItOut provided some ideas for printing your word cloud on shirts, mugs, and other gift accessories. I don't think I noticed this capability in Wordle.

Tagul was the only site of the 4 that you needed to create a login for. However, its free and easy to create a login for this site. Only takes a minute or two, and then you are in. The thing I liked about Tagul was how dynamic the words in the cloud were. By default, all words in the word cloud are set to defer the person clicking on the word in the word cloud to a dictionary on Google. With Tagul, you could also set the word cloud to a defined shape, like circle/ellipse, diamond, heart, circle, cloud, and triangle. When you are done and you have your shape set up the way you like it, I recommend going to that site and downloading the picture image. Tagul also provides you with embed code to add your image as a flash object on your web page. And for iPad users, they provide an .svg version which allows for similar viewing as the shockwave-flash version. I think this is a great addition to the site and adds to the usefulness of the tool.

Another one of the nice things about Tagul is that you can save and download your images with a transparent background. This comes in handy when adding your word cloud to a site that does not have a white background.

Click on the word cloud image below to see it in Tagul. Run your mouse over the words to see it in action.


Tagxedo:
The last site I learned about is Tagxedo. The cool thing about Tagxedo is that you can form your word cloud into many different shapes, much more than the basic shapes Tagul provided. And if any of those shapes are not working for you, then upload your own shape to use. (I uploaded a gear to add my engineering words inside of.)

Tagxedo allows you to to take any website, blog, RSS feed, Twitter account, news article, pretty much anything on the web and turn it into a word cloud. Besides uploading your own image to use as a word cloud shape, you can also use your own local fonts. There are many different color themes to choose from, or you can create your own. Saving your word cloud in Tagxedo is easy with so many different ways to choose from. You can save as an image wiht a wide range of sizes and extensions, even thumbnails, share in gallery and get URL and the iFrame embed code (under the Web tab); you can print it, save as a thumbnail; or in the Advanced tab you can save the link to the full size image or download it as an .html page. And when you are done with your Tagxedo masterpiece, think about having it printed on a mug, t-shirt, totebag, mousepad, or many more gift items in their store.

One thing I did notice, being on a Mac, is that when I initially tried creating my word cloud in Tagxedo in Safari, it wanted to update and install my Microsoft Silverlight. When I switched to Firefox, I did not have any issues with the site.

You can view the word cloud below in Tagxedo and see the dynamics by clicking on the image below. The gray gear background is not there, but you can roll over the words and see them pop out.


And that's four word cloud sites, using the same word list, all done differently with the tools provided in each site. I hope you will take the time to play around in each site to see what it can do for you in your classroom. Special thanks to Kim Munoz for featuring these sites in a webinar, and to SimpleK12 for their webinar series. If you are looking for more ideas on how to use these sites, Kim has links in her blog on to different articles written about these sites.


Monday, July 11, 2011

SimpleK12 Webinars are a good investment of summer time

Today I participated in a wonderful webinar by SimpleK12 on using word clouds in the classroom. It was called "Tag, you're it! - Free Word Cloud tools" and was taught by Kim Munoz, part of the "Wonderful World of Web Tools" series. This was my first webinar from this group, but certainly not my first webinar. I had a little trouble getting in, especially from my technology room at school, but once I got in, I was fully engaged the entire time. By the way, if you are on a Mac, and trying to get into one of these webinars from behind a firewall, such as a school network, I highly recommend using Firefox over Safari. After multiple attempts to join the meeting (gotomeeting) on Safari, and having Safari go unresponsive on me, I switched to Firefox, and got in immediately.


The webinar was an engaging half an hour giving me an over view of four word cloud sites and tips for using each site. (Look for the word cloud site review coming soon!) I could see where she was going, what she was typing in, what buttons she was pushing, and also hear her explanation of the steps she was taking as she went along. There was also a chat window on the side that offered me the chance to ask questions along the way (or offer a suggestion) that was shared at the end of the webinar.


The webinar was short, only thirty minutes, but yet, gave me exactly what I needed about some helpful tools I cold use in my classroom. I'm signed up for two more this week, and a few next week as well. Looking forward to getting some more professional development in while I have the extra time during the summer. My son, who came to school with me today to help work on some of the computers, followed the webinar right along with me, and learned a thing or two about using word clouds.


SimpleK12 has many different webinars to choose from on technology that are offered free of charge. They are presented by leaders in educational technology, many of whom I follow on Twitter and in my PLN. Some of the webinars offer include using Skype with your students, 21st Century teaching tools, using mobile devices in education, virtual field trips, how to convince kids that writing is fun, using Google tools, and creating posters in Glogster, just to name a few. All you have to do is go to the site (http://simplek12.com/tlc/webinars/), select some webinars that interest you, sign up (name and email address), wait for the email, click the link on the email when its time, sit back and enjoy. Its that simple!


Now you could check out all these places and tools on your own or you can be actively engaged with others learning more about their potential with your students from other educators who already use them. Its only half an hour - that's the length of most sit-coms, and its summer time. You don't even have to drive anywhere to attend a workshop. You can participate right from the comforts of home, school, or wherever you are (with Internet, of course). What do you have to lose?

Thursday, July 7, 2011

Timeout for Updates

A friend of mine told me I needed to take a technology timeout; and I'm wondering what's a timeout from technology? I read in a blog yesterday written by a man that was trying to take a time out from technology by spending a week on the beach. I thought it was a little ironic that he was taking the time to blog (I think, via his cell phone) while he was supposed to be relaxing on the beach. (But a well-written blog post, nonetheless!)

Yeah, okay, so you are writing about the irony of saying you are taking a break from technology then using technology to blog. What's your point? The point I am trying to say, and wonder, is Is there really such thing is a break from technology, aside from going Amish? Have we really become so attached to our high-tech devices as a society that we cannot let go, kick back and enjoy the beauty around us?

I think there is a happy medium, though. Sometimes we can get so caught up in trying to do day to day activities, such as work and home, and trying to keep up with our social media (Facebook, Twitter, blogs, etc) that we fail to take time out for some things that need to be done. And then we put those tasks off, procrastinating to the point where the tasks become to daunting that we feel overwhelmed.

Last night as I was waiting, rather impatiently to try to get into Google Plus, I pulled up some student podcasts from this past year that I have been needing to post to the website. One thing led to another and before I knew it I was redoing my teacher page that is attached to my school's website. The teacher site had been needing to be updated since the beginning of last year, and now it is time to update it once again for the coming year. Now, I know some would have said to just ditch the student work and forget adding it to the website, try for next year. But it was important for me to showcase them on our website for the students and the parents. This was something that needed to be done while school was still in session, I realize, but at least now they are up there. And I can find some comfort, or relaxation in the knowledge that I followed through with what I told my students.

After spending the night working on several pages for my teacher site and seeing that all shiny-new on the website today, I'm thinking maybe its time to stop procrastinating on other issues, and get to it! (We won't even talk about organizing my desk at home in this blog post! :) (Sorry, babe...) If you are a regular reader of this blog, and have been kind enough not to comment on the state of the rest of the website, I dearly appreciate it. However, it has been sadly neglected and desperately needs a make-over. Time to stop tossing around all those ideas in my head for what I want to change and put it to action! This is what I mean by taking time out for updates. Time to stop paying attention to what's happening on Twitter or Facebook - all those posts will be there for me to catch up on when I come back, the school's website is pretty well updated and everyone's happy (that I know of) with that. So, now its time to turn my attention to something that I'm actually paying hosting on, but am too embarrassed to show of in my ed tech circles. No more excuses, no more apologizing, just going to knuckle down over the next week or so and get it done. :)

What is it that you are needing to work on? Do you have a pile on your desk, or a folder in your computer that you have been collecting stuff, but never putting to use? How about taking a technology timeout for updates? At least a time out from the social media scene...

Saturday, July 2, 2011

Can computers replace teachers?

Today's blog question comes from a topic I read about in LinkedIn (http://www.linkedin.com/groups/Technology-Integration-in-Education-108447) - can computers replace teachers?

This is an interesting question, and something to think about as our technology becomes more and more advanced. Yesterday I was twittering as I sitting in my living room watching tv with my boyfriend. And as we were sitting there, him on the iPad, and me on the iPod, half watching an older movie/quoting lines from the movie together, and half sliding our fingers across the Twitter screens on our perspective iOS devices, we began to Tweet back and forth to each other. Mind you, we were only about 2-3 feet away from each other and could reach out and grab each other's hands if we wanted to. But there we were communicating to each other through Twitter.

This brought to mind another scene I've seen quite often in my own children, and at times, with my students, and that is texting to each other while standing next to each other. (Is texting the new talking?)

I bring these two scenarios up to show just how reliant we have become as a society on our digital devices. And, I'm sure Hollywood would like for us to believe that there is some possibility for computers to replace our teachers. After all, they've had a holographic program replace a doctor, a robot replace a boy, and an artificial intelligent man become a beloved member of a household, even to the point of becoming the great-granddaughter's husband.

This question also reminds me of a short story I wrote in one of my college English classes some years back about a day when technology failed in an elementary school and everyone had to revert back to battery powered lanterns to light the class, and books (actual hard covered paper books) to teach the class. This sounded very futuristic at the time that it was written, but with so many school districts moving forward in the next five years replacing textbooks with digital copies on tablets, some of those thoughts are not so far-fetched as they once were.

My thinking is that while we may be moving more towards a digital horizon where tablets replace textbooks, and biometrics built into OLED desktops take the place of old fashioned attendance records, students still need teachers. While it may seem like teachers are being replaced by computers with so many online classes are being offered, and students are able to work at their own pace rather than sitting in a physical classroom listening to a lecture by a flesh-and-blood instructor, teachers (certified teachers, at that) are still the ones responsible for planning the syllabus and course work offered in the online courses, and still may be providing the lectures, even if they are recorded.

Today's high schoolers, and some middle school students have the opportunity for acceleration (or remediation) through virtual schools, but the course work, curriculum road maps, tests, assessments, and even data collection, are still done, planned, and evaluated by certified teachers.

As a twenty-first century teacher, it is our duty to integrate technology into the classroom; however the integrated technology is by no means a replacement for our teaching, merely a tool or means of presentation. It is still our duty to evaluate and monitor student progress, measure the lessons according to benchmark standards, and differentiate instruction as we see fit to meet the needs of our students. Teachers make decisions everyday that affect their future lesson plans based on many aspects of his or her students' responses to an activity, some of which is read through body language, and the teacher's understanding of the student.

Sure computers are capable of evaluating and making decisions based on responses, but not to the level of complexity and humanity that a real, live, breathing teacher is capable of. A computer's decisions are based on a series of if-then clauses, zeroes and ones; opened and closed. No computer can evaluate the depth and richness of a student's artwork, or appreciate the complexity of creative dance move. If it could, my bet is that a teacher wrote the algorithm.

What's your take on this? Is it possible for computers to replace teachers? If yes, to what extent?

Saturday, May 14, 2011

Default Printer Settings in iWork Pages

This week I discovered something peculiar at school while using iWork Pages. Pages has its own default printer settings, and it doesn't necessarily go by what your computer has set for default printer. In a networked environment, like a school, or even a home with more than one printer, this can get a bit annoying. I thought it was just my computer being wacky, not that my macbook pro would ever behave in such a manner, until someone else noticed this and emailed me about it. So, as I often do when I don't know the answer to a troubleshooting problem on the computers, I "googled" it. (Isn't it funny words become added to our vernacular? I mean 20 years ago, if you used that as a verb, people would say - you did what?!) This is what I found:

Pages defaults its print settings to the first printer in your printer list. As I said, this could get a bit bothersome if you are in a networked environment, like a school setting, where every classroom has a network printer. You could end up printing to the other end of the school without even realizing it if you are quick to hit the print button.

Fortunately, there is a way to fix this. Create a new document in Pages. You don't even have to type anything in it really. Hit print, then browse your printer list to find the printer you would like Pages to default to. Print your new document to your preferred printer, then save your document. From this point forward, any new document you create in Pages will default to this printer when printed. (If you change the printer, though, to say, like, a color printer, and, then save the document after it is printed to the newly changed printer, the new printer will then be your default printer.)

However, this default printer setting does not apply to any documents that were previously created and saved. These will all have to be changed as you open and print them the first time through. If you save them again after you change the printer to your preferred printer, they will then be saved with the default printer setting being saved to your preferred printer.

Tuesday, February 22, 2011

Digital Scrapbooking with iWork Pages

While browsing through the children's book section of Border's books this weekend trying to decide how to spend my remaining gift cards before it was too late, I came across a book that was both intriguing and inspiring all in one. I was at first drawn to Melissa Sweets' illustrations resembling carefully constructed collages of various type styles cut from old newspapers, colored-pencil drawings, patterned wallpaper pieces, and leather bound journal pages. However, as I began to glance through the pages, poems and words and rhythms rushed off the pages and filled my mind with lesson plan ideas for a poetry unit with my intermediate students. Not knowing anything about William Carlos Williams (Yes, I admit it! I have never heard of his works until now.), but seeing magic the title "A River of Words", I decided the book was a worthy investment. And now I am so glad I bought the book! For those not familiar with William Carlos Williams poetry, or Jen Bryant's work, I highly recommend the book, "A River of Words: The Story of William Carlos Williams" by Jen Bryant. His story is an inspiration and a true testament of the American spirit.

But, I didn't write this blog today to tell you his story. I'm writing to share a technical discovery that was inspired by Jen Bryant and Melissa Sweet's book. This is something I have been wondering about the possibility of doing for some time. But finding this book and seeing Melissa Sweet's creative illustrations inspired me to actually sit down and play with Pages in iWork to see if digital scrapbooking could be done.

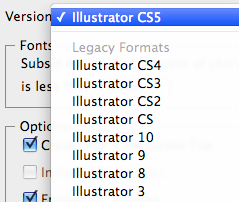
As a long time fan of AppleWorks, I was skeptical when Apple first introduced Pages and Keynote some years ago (nearly 6). I tried Keynote with a trial version I picked up at FETC and liked it immediately, but it took me some time to really see the potential in Pages. I really liked the ease of designing in the drawing side of AppleWorks and liked having Apple's clipart at my fingertips, a feature missing in Pages. In fact, it wasn't until I began seriously writing college papers and needing a Mac replacement for Word that I began using Pages. (I've since fallen in love with the application in spite of the obvious lack of a vector clipart catalog. What it lacks in clipart, it makes up for in style and features, such as its masking ability with images.

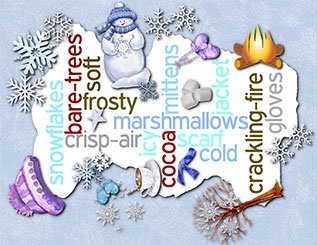
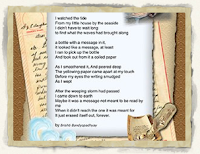
The introductory image to this blog write up shows a small sampling of a digital scrapbook page I created in Pages today borrowing a poem I found on the Internet by Brishti Bandyopadhyay. I have to admit, though, that it helps to have a tidy stash of scrapbooking backgrounds, elements (clip art), trimmings and what-nots before beginning a project such as this. Kind of like scrapbooking with a paper album - you would want to make sure you are well stocked with a wide variety of materials just for that purpose before beginning, and that all of your tools (such as scissors, glue sticks, archive safe markers and tape) are close at hand. It also helps to be familiar with your tools, or in this case, Pages inspector palettes and tool menus.

One of the attractive features about most scrapbook pages is the layers - the depths of colors and patterns. Most of the fancier ones combine several different patterned papers within the same color palette or theme, rather than pictures neatly stuck on plain white pages with black corner brackets as in the photo albums of old. So get used to working in layers, if you are not already.

To start with, decide on your background layer. What kind of pattern, print, texture, and color do you want to base your page on? While there is no particular command to insert or modify the background, your background image can be inserted as a regular image and stretched to encompass the entire size of your page and then some. Don't worry about it going off the page as it will all be "cut off" when it prints out. By this, I mean, do not worry if you have to stretch it to the point where the edge of your image goes off the visible area of your page. I started with a blank page/blank canvas in the Page Layout part of the Chooser. Then went to Insert>Choose and searched my files for the selected background image. As I said above, once the background image was inserted, I had to stretch it and pull it until the whole sheet of paper was covered.

Next, I selected a lighter, more neutral color paper background to layer on top of the background. I set it so it was smaller than the background layer so that the background layer would show around the edges of the lighter shade paper on top of it. When Pages inserts one of your images, it locks the aspect ratio and keeps the proportions when you stretch and resize it. You may need to apply a mask to this new layer so that it looks like this paper is slightly smaller proportionately to the background layer. (Format>Mask). If you click on the image, you will see handles around the corners of the image allowing you to resize of edit the image. If you click at the bottom of the image, you can resize the mask, if you like. If you hold down the Command key and mouse over the corner of the image you will notice the arrow cursor turns from straight to curved. If you click the mouse button as you are holding down the Command key and moving the corner of the image one way or the other, you will be able to rotate the image. You can do this as many times as you like adding multiple images and layering them one on top of another. If you go up to Arrange you can move the layers forwards or backwards as you like.

The Inspector palette provides some added options to customize your scrapbook page, under the Graphic Inspector (looks like a green square with a blue circle stacked on top and to the right of the square). If you select Picture Frame under the Stroke section, you can add a torn paper edge or embossed edge to your "paper layer". You can also adjust the Shadow and Opacity of the layer in the Graphic Inspector tab.

Textboxes may also be added an layered like the background images. Select the Font palette to change the font style, color, and size. You can also color the background of the textbox adding even more depth to your scrapbook page. Then head back to the Graphic Inspector tab to stylize the textbox as you would an inserted graphic.

If you have a nice collection of transparent .png clipart images, those can also be added to your scrapbook page much in the way of decorating your paper scrapbook page using stickers, decals, and appliques.

Once you are done, print it out, or save it as a .pdf which can then be brought into a graphic editor such as Adobe Photoshop. The .pdfs can be attached to email documents for convenient sending to relatives and friends, say, like as a Christmas newsletter, or to mark a special occasion you want to share/show off. What are some of your creative ideas for this application of Pages?

Monday, February 21, 2011

Site review - adobetutorialz.com

I've recently discovered a new site, or new to me site, I should say judging from the whois registration information. (Why I am I just finding this site 5 years later?) I originally found the site as a great photoshop wallpaper tutorial site; that is, a great reference site for creating wallpapers using Adobe Photoshop. However, after a pretty thorough search of the website I see it as pretty much a one-stop shopping site of tutorials for any adobe product, including any of the acquired Macromedia design products such as those included in the Studio MX and MX2004 suites.

Judging by some of the comments in some of the tutorials I read, I would say it is most likely not a site for a newb, but it may be a site for a novice, especially if you are already somewhat acquainted with any of Adobe's design products. In the photoshop and flash tutorials (as in most of the tutorials in the site) there are pictures/screen captures that walk you through each step of the processes; however it will definitely be of help and a great time saver if you are well familiar with the tool palettes in the particular program/application that you are doing the tutorial on. I'm also a firm believer in twice reading a tutorial. One time through without the program being open reading through what you are going to be doing. This gives you somewhat of an idea of how tricky the techniques are going to be and allows you to plan idea and gather any extra materials or plugins that you will need. And then read it through a second time with the program/application being open following along with it, once you have determined you are able to follow along and have gathered the appropriate materials you will need.

At a first glance, the site is a confusing mess of ads, articles, tutorials, and banners. I recommend either typing in a keyword of a tutorial you would like to search for, or scrolling down to the very bottom of the page to find their navigation. There you will find a categorized menu of links breaking the site down into: Acrobat Family, Adobe Photoshop, Adobe Technologies (which includes PDFs, JDFs, Metadata, Xara, PostScript, and printer drivers), Creative Suite Family, Design Software (which include Swish, CoffeeCup, Xara Xtreme, and font maker reviews), Digital Imaging, Digital Photography Software (reviews and firmware updates), Freebies, Macromedia Products, Photoshop Plugins (only one review in there at the moment - Alien Skin's Exposure), Print and Web Publishing, and Video & Audio (including some pointers in Premiere Pro). You can also subscribe via RSS, email updates, or follow them on Twitter.

When you are using the tutorials, you will definitely have to turn a blind eye to the advertisements or they will drive you bonky. Although I do have to admit I have not found any of the annoying and seizure-inducing blinky banners like on some sites. But, you will definitely have to know what to click on, what to read, and what is just purely advertisement, or you may end up getting very lost. I suppose this is what you will have to tolerate though for a reference site that is free without having any logins and hosted by Host Gator.

I have been using Photoshop since version 5.0.5 came out over 12 years ago, and although I am confident in my skills in photoshop, I would consider myself an amateur hobbyist at best in the program. I have three different versions ranging from CS to CS5 on my various computers, but I'm always happy to learn more about one of my favorite programs. I've been a fan of such photoshop sites as: Planet Photoshop, and Photoshop Cafe. And now I am definitely adding this site, Adobe Tutorials (with a Z!) to my list of Adobe reference sites.

Incidentally, the search that led me to this site initially, was "romantic valentine backgrounds" in a Google image search. I not only found a romantic Valentine background, I also found out how to make it and created my own. :)


I had this on my desktop at home on Valentine's Day while I was at school. My boyfriend loved it! He loved it even more when he learned that I made it.

Here is another one I did using a combination of a couple of tutorials I found in that site:


I must admit I have yet to find the fireworks brush set that I was shown in one of the tutorials, but I did find others, and I like the way mine turned out. In case you are looking, I could not find a tutorial for a wallpaper about Presidents' Day, but I did a search for "patriotic" and found a grunging background I liked, then did a search for "fireworks" and found another tutorial that worked for me.

What are your thoughts on adobetutorialz.com? Have you used this site before? Do you subscribe to the site? What way do you use this site?

Thursday, January 6, 2011

The Five Senses of Winter

I went to lie down the other night after being up most of the night working on lesson plans and other projects I had been wanting to do on the computer, but never finding the time, and found that even though I was beyond exhausted-tired, my over-active creative brain would not let me sleep. Never mind the big log-sawing bear beside me, also making it difficult for sleep to overcome me. (The realization that I had to get up for school in a little more than an hour didn't help matters any, either.)

As I laid there listening to the vicious snoring behind me, my mind began to wander through crafting land with visions of words, clip art, and torn pages mingled and danced around my head. Words connected by a centralized theme twirled around every which way in an iridescent array of colors falling and stacking much like the blocks in Tetris. If I wasn't so exhausted I would have gotten up and gone right back on the computer to work on the ideas that tumbled around in my brain. The more I thought of them, the more I liked them. And then the more I felt I wouldn't be able to use the ideas with my students who were learning about the five senses and winter. And, the more I tossed and turned mulling over the idea.

The next night the idea was still at work in me, so I sat down at the computer to flesh it out and bring it to life.

Last month a colleague and I were fortunate enough to attend an all day Discovery Education workshop where she, my colleague, learned about some nifty word play sites. One of the sites was a site called "Wordle" that turned lists of words into a work of art.

I began to think about a lesson I had been planning for the Kindergartners where we would experience more of each of the seasons by relating the seasons to their senses. (What does winter smell like? What things do you see in the winter? And so on.) And I thought about "Wordle." Then I thought about them creating a journal, and the journal ended up looking something more like a scrapbook.

For those unfamiliar with "Wordle", the site is a "word cloud" generator. It allows you to type or paste in text which it then takes, jumbles up, and presents them in an array of directions and colors. You can also customize the color palette and the font of the words. You also can change the layout of the text and the background color. The word clouds end up looking something like this:

Then I started thinking about the students tearing the edges and decorating around it with pictures that relate to their words, and wondering what other technical elements I could have them add, or how else I could have them utilize the computer as a tool for their project. Before I knew it, I was in photoshop turning my "Wordle" into a digital scrapbook page.

Now, I'm thinking of trying to work it into an older grade level lesson...